With the Applications plugin, candidates can apply for jobs using a form, and employers can view the applications on their job dashboard.
Installation
This plugin requires WP Job Manager 1.22.0 and PHP 5.3+.
To install this plugin, please refer to the guide here: https://wordpress.org/support/article/managing-plugins/#manual-upload-via-wordpress-admin
Intended Usage
This plugin can be used in two ways:
- If you offer job listing submissions on the front end, you can use this plugin to have applications appear on the employers’ job dashboard.
- If you list your jobs, you can have applications come in and be visible in the admin dashboard.
Settings
The plugin can be configured from Job Applications > Settings.
The following settings are found on the Application Forms tab:
- Email Application method – Use application form – When enabled, this setting will display the job application form for jobs setup with an email address for applications.
- Website URL Application method – Use application form – When enabled, this setting will display the job application form for jobs set up with a URL for applications.
- User Restriction – Only allow registered users to apply – The form will not show to guests until they log in.
- Multiple Applications – Prevent users from applying to the same job multiple times – If enabled, once a logged-in user has applied they will no longer be able to see the application form for the same job.
- Terms and Conditions Checkbox – enabling this requires the applicant to check it before completing their application submission. The page and it’s contents are not created by WPJM or Applications, and once created, can be set in Job Listings->Settings->Pages.
- ReCAPTCHA – This will help prevent bots from applying for jobs. You must have entered a valid site key and secret key in WP Job Manager’s settings.
The following settings are found on the Management tab:
- Delete with Jobs – Delete applications when a job is deleted – If enabled, job applications will be deleted when the parent job listing is deleted. Otherwise, they will be kept on file and visible in the backend.
- Purge Applications – Enter a number to purge all applications after that many days.
- Personal Data Erasure – If enabled, applications with a matching email address will be sent to the trash during personal data erasure requests (Tools > Erase Personal Data). They will then be permanently deleted after 30 days.
Job Application Forms
If enabled, you can use a Job Application Form for users to apply for a job instead of the usual email/website link. The default form looks like this:
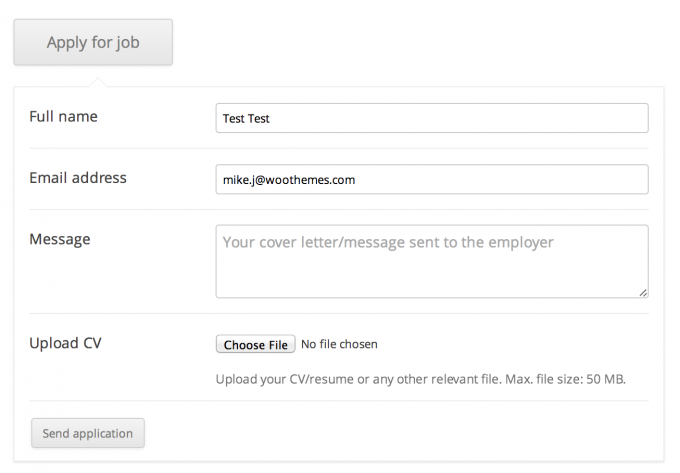
When the application form is submitted, an application will be saved to your database. The employer will receive an email notification if the job application method is ’email’.
Note that the email notification will go to the email address on the account that posted the job. So if you want to customize who receives notifications, you would want to create accounts and post the jobs from those accounts.
Once an Application’s status has been set to “Hired”, the message “This position has been filled” will appear on the job listing.
Note: You can also add the shortcode [job_apply id="X"] to a page to display only the application form for a particular job listing. Substitute the X with the ID of the job for which you wish to have the application form.
Multiple Application Forms
Starting in version 3.0.0 of the plugin, you can create multiple application forms for your job listings.
You might decide to use multiple application forms for your job listings. Maybe one application requires more questions, uploads, or job-specific things you might want that other job postings don’t require.
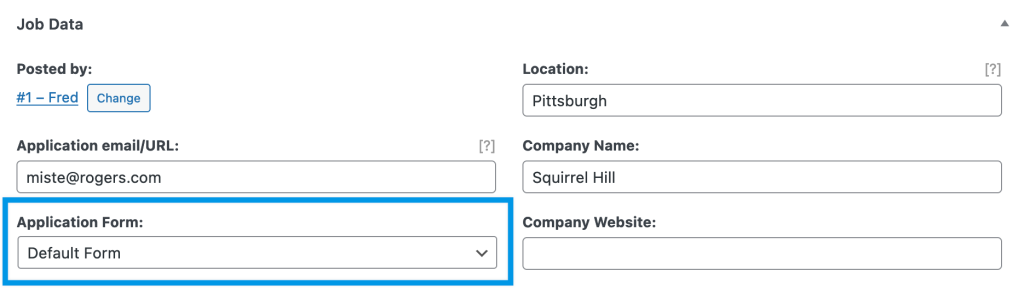
To get started, create a new Application Form from Job Applications > Application Forms by clicking “Add New” at the top. Customize the application to your needs and click “Publish”.
Now that you have a new Application Form, you can assign it to a job by going to the job listing, and going to the Job Data section near the bottom of the page. You will see a field named “Application Form”, where you can select the application form you want to be used with that position.
Customizing the Job Application Form
To customize the Job Application form, go to Job Applications > Application Forms, you can either edit the default form or create your own form.
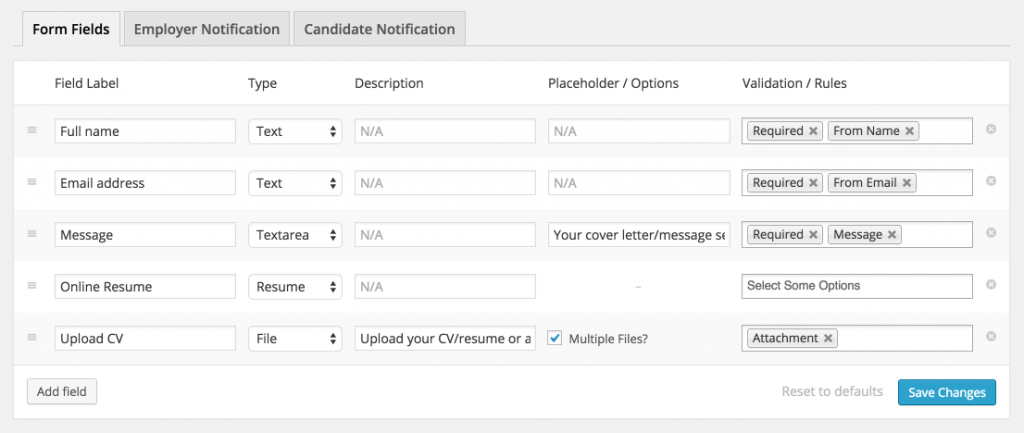
From here, you can add, remove, edit, and re-order form fields. Available field types are:
- Text
- Textarea
- File
- Select
- Multiselect
- Checkbox
- Resume (requires the Resume Manager Add-On)
- Output content (this is content that will appear in the form but not have any forms to be filled out – useful for things like headings and descriptions)
- Date
Validation Rules
You can add the following validation rules to your application form fields:
- Validation
- Required – Makes the field required, so the form cannot be submitted if the field is empty.
- Email – Force the field only to accept a valid email address.
- Numeric – Force the field to only accept numeric input.
- Data Handling
- From Name – Use this field as the ‘From name’ in the application email (it can only be used once).
- From Email – Use this field as the ‘From email’ in the application email (it can only be used once).
- Message – Use this field as the main content of the application email (it can only be used once).
- Attachment – (for file uploads) Include these file(s) as an attachment to the application email.
The plugin does not have support for conditional fields. If you need that, you can use an alternative form provider that does offer this feature.
Customising the Employer & Candidate Notifications
Each Application Form will have its own employer and candidate notification emails.
If you want to change the defaults, go to Job Applications > Application Forms and click “Edit” for the form you want to change the notification emails.
You will see three tabs from there: Form Fields, Employer Notification, and Candidate Notification. You can select the notification you want and start making changes.
Only an employer notification is sent by default, but if you add content to the candidate notification, candidates will also be notified.
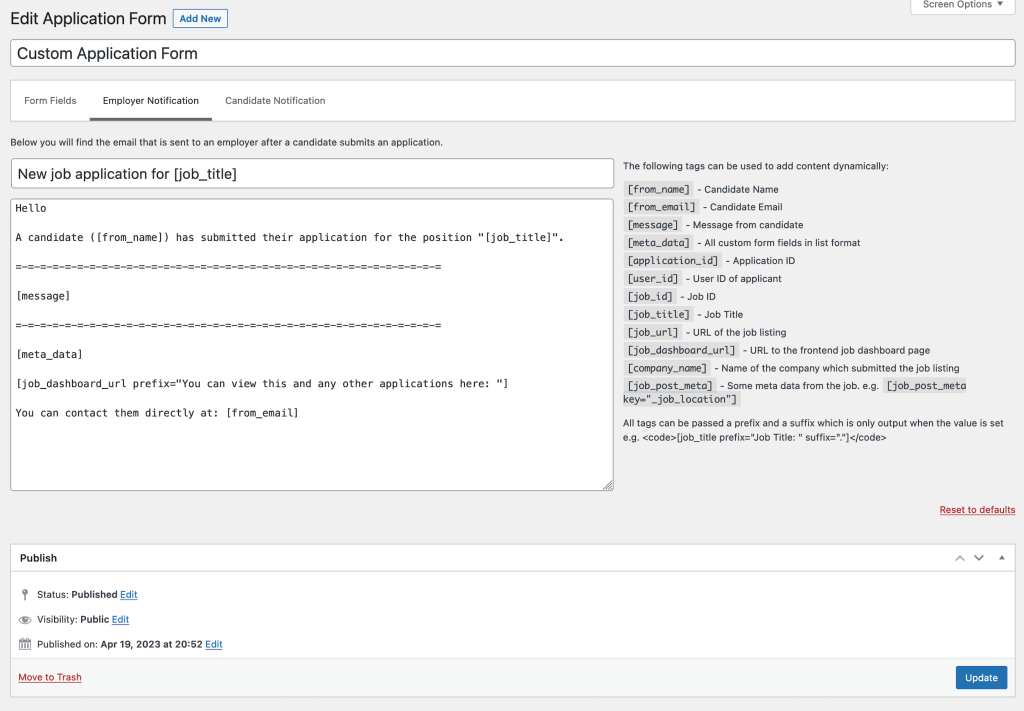
The top field will be the email’s subject line, while the bottom text area field will be the email contents. The right side of the page shows which dynamic tags you can insert into your message + subject. These will be substituted for real data at the time of sending.
Viewing applications via the job_dashboard shortcode
When the applications extension is installed, a new column will be shown when viewing the job dashboard on the front end:
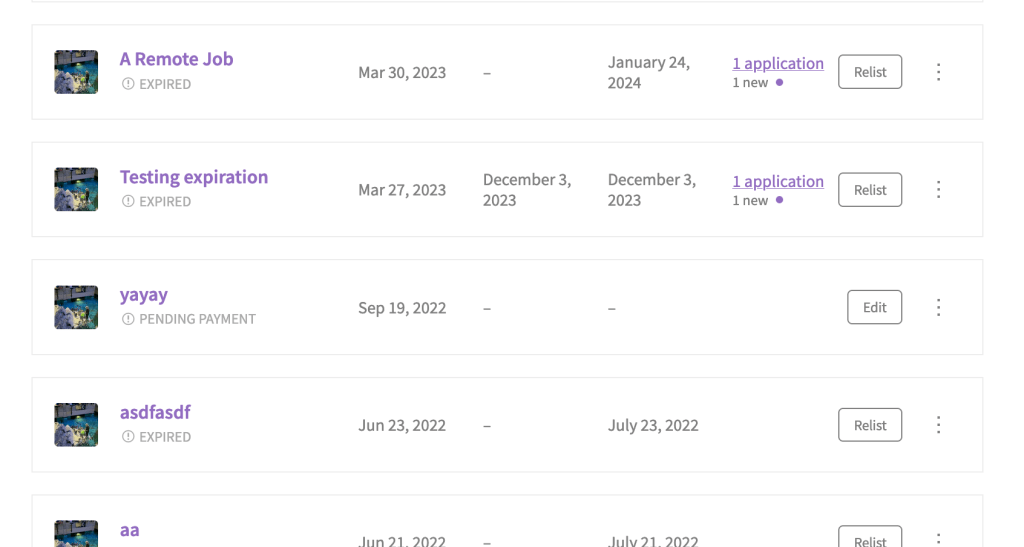
This will show the number of applications per job listing. Clicking the number (when there are applications, e.g., 1 application) will reveal the application list. From there, click on the icon showing three horizontal lines to expand and view submitted applications:

Above the applications, you can choose to filter by status. Statuses include:
- New
- Interviewed
- Offer extended
- Hired
- Archived
You can also sort the applications by date, name or rating.
Each application card has some icons which can be clicked:
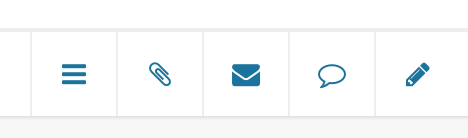
In order:
- View description
- View attachment
- Email candidate
- Private notes
- Edit
A Note on Emailing Candidates
The email candidate link uses the mailto: protocol to send emails to candidates. It uses your system’s default email client to send the email.
The default email client is something your web browser and/or operating system sets, rather than WP Job Manager, Applications, or WordPress.
If you want to use the email candidate button and have the mail sent from your company email (vs. personal), you’ll need to set up a default email handler for your company email address.
As an example, this guide will help you set Gmail as the default mail handler on a variety of systems:
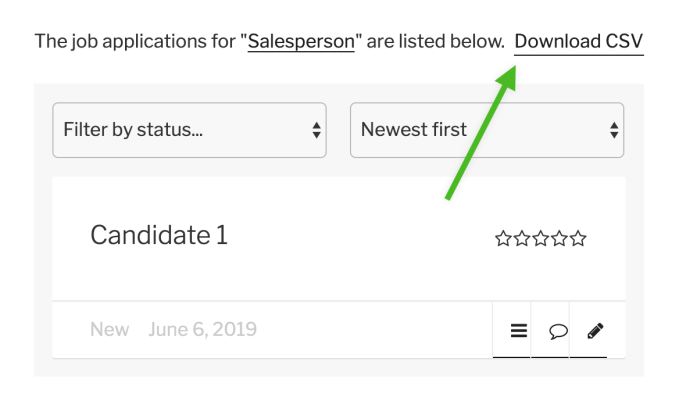
Downloading Application Data
When viewing all applications for a job listing in the Job Dashboard, you can click on “Download CSV” at the top of the page to download a CSV file containing all the application data for that job listing.
If you need to download data for all applications on the site, you can export an XML file of all Job Applications via Tools > Export.
Viewing applications via the admin dashboard
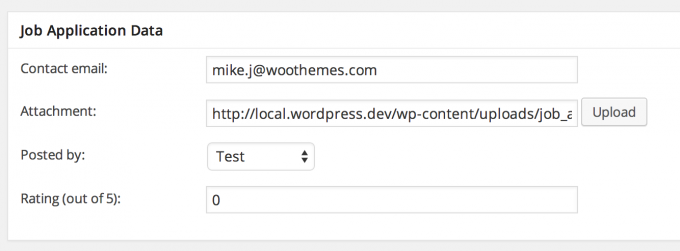
In the WordPress admin dashboard, you’ll see a new section called Job Applications. Going here, as an admin user, you’ll see all applications:

These can be filtered by job and filtered/sorted like the frontend view. If you click to view an application, you’ll be able to edit the following:
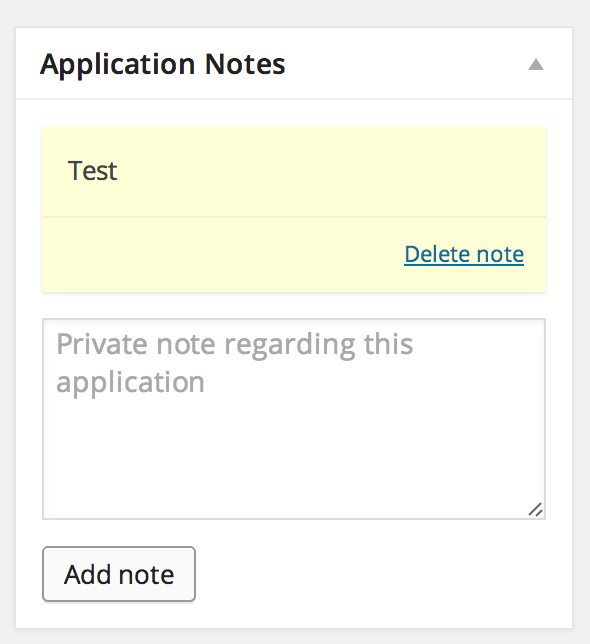
And you’ll be able to add notes:
Past Applications
You can also allow candidates to view their past applications by adding the [past_applications] shortcode to a page. If you use the Resume Manager add-on, you’ll most likely want to add the shortcode to the Candidate Dashboard page created during that plugin’s setup, but it can be added to any page.
See how to change the number of past applications displayed per page.
Integrations
Resume Manager
If you are using Resume Manager, the application form will show a select box for the user to choose their online resume. This will be noted with the application allowing the employer to view the online resume.
Applications Add-on FAQs
Can I create different application forms for different Jobs?
Yes, you can create multiple job application forms, starting with Applications Add-on version 3.0.0. Please refer to this section for more details.
How do I activate application follow-up emails to enable the candidate to send several follow-ups after applying?
By default, WP Job Manager Applications just sends one email to the employer. The second one, which can be sent to the candidate, has to be defined in the settings tab of the Applications addon. If you want to send multiple notifications you have to use a third-party plugin such as WP Job Manager Emails.
Multiple follow-up emails aren’t a feature included in WP Job Manager and its add-ons. This implementation may be possible with custom development, however, we aren’t able to help with custom code requests like this, so if you need assistance, you may want to look into a third-party service. You can also explore different mailing list options.
How can I prevent search engines from indexing submitted job applications?
While the Resume Manager add-on for WP Job Manager includes settings to discourage search engines from indexing resumes, ultimately it is up to the search engines to respect this request.
For an additional layer of security, you can try implementing server-level blocking using the .htaccess file, as described in this guide: https://www.malcare.com/blog/how-to-restrict-access-to-wordpress-files-using-htaccess/. This method allows you to restrict access to specific folders, including the one containing application PDFs. However, this requires server configuration and it is recommended to have your hosting provider assist with this to ensure it is set up correctly.
Additionally, there may be WordPress security plugins available that offer features to help control file access and prevent indexing.