The Job submission form is shortcode powered and must be added to a WordPress page in order to be used.
Setup
Create a new page, name it something along the lines of Submit Job and then inside the content area add the shortcode:
[submit_job_form]It is best to insert the shortcode into the ‘text’ view of the visual editor to ensure it gets formatted correctly.
Job submission steps
Step 1 – Job and Company Detail Fields
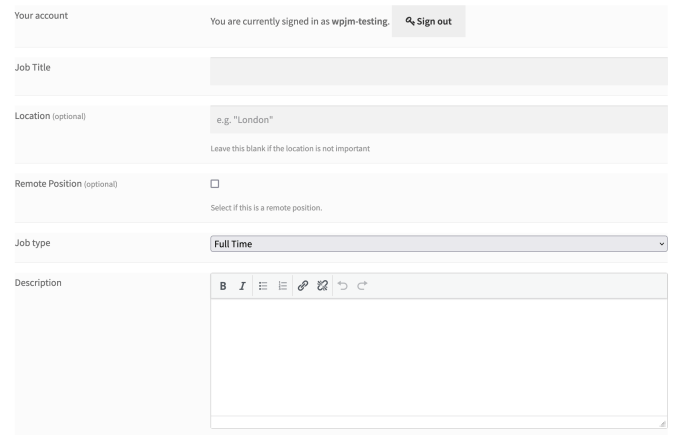
The first field in the job form shows the “Your account” row.
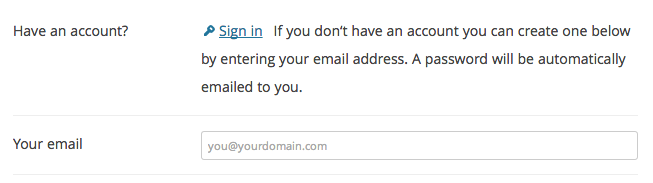
This field’s display varies depending on your settings.
- If the user is logged in this shows the currently logged in user.
- If the user is logged out, accounts are not mandatory, and “Allow account creation” is disabled this shows a sign in link.
- If the user is logged out, accounts are mandatory, and “Allow account creation” is disabled the form is disabled.
- If the user is logged out, accounts are mandatory, and “Allow account creation” is enabled an email field is shown to allow signup.
After the account section, the top-most part of the form shows the Job Fields – these include:
- Job Title
- Job Location (optional)
- Remote Position (optional)
- Job Description
- Job Type (e.g. freelance)
- Job application URL/email address
If categories are enabled in the settings that field will also be visible.
Beneath the Job fields there is a section for company information:
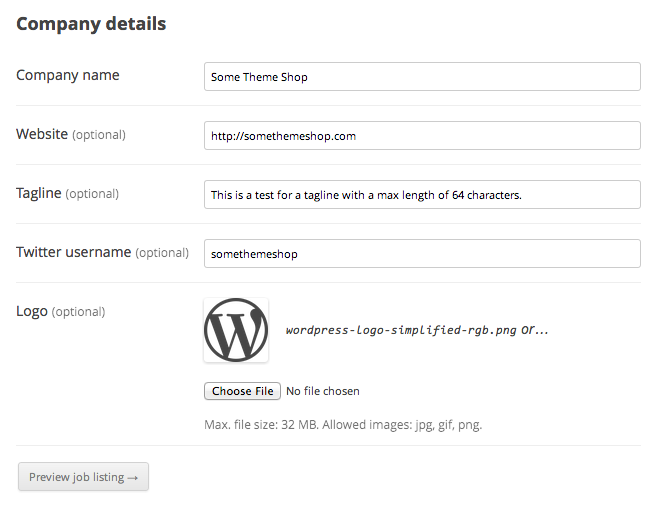
These include:
- Company name
- Website
- Tagline – A short description of the company
- Twitter username
- Logo
These fields will be pre-filled where appropriate if the user is logged in and has submitted a job in the past.
Change the WordPress Logo Size
If you need to modify your logo size, WordPress lets you adjust it directly within the platform. Here’s how:
- Go to your WordPress dashboard.
- Navigate to the Settings > Media tab.
- Look for the Image sizes > Thumbnail size section.
- Change the default width and height of your thumbnails in pixels.
You can also set image sizes in your theme. Take a look at this WordPress.org page, as it will give you the step-by-step instructions:
https://codex.wordpress.org/Post_Thumbnails
Step 2 – Preview
The preview page shows the job details which have been submitted in the style of a single job listing. The user may click “Edit” to change the details of their listing, or “Submit” to submit their listing for viewing or approval (depending on your settings).
If you’d like to remove the Preview step, check out this tutorial to learn how.
Step 3 – Confirmation
A short message stating the status of their newly created listing.
Customisation of the job submission form
Adding, editing, and removing fields can be done using filters. See this tutorial (advanced) to learn how.
FAQ
Can I prevent an employer from applying and submitting a resume on a job listing they published?
You cannot prevent an employer from applying and submitting a resume on a job listing they published using the Resume Manager add-on for WP Job Manager. This means that when an employer is logged in and views their job listing, they will still see the “Apply Now” button or the option to submit a resume.
If you want to further restrict the ability of employers to apply to their own job listings, you can use WordPress user capabilities to control who can view resumes and contact data. By adjusting the user capabilities, you can limit access to resumes and prevent employers from submitting their own resumes on their job listings. Just keep in mind that by changing this, you will remove the capability for them to see and check data as employers, and this will have consequences in the way the account can handle their job listings. For more information, see The Employer Role.
While we can’t directly walk you through editing WordPress user capabilities, it’s a customization that can be achieved with some technical knowledge of user roles and capabilities within WordPress. Please note that modifying user capabilities falls outside the scope of our support, and we can’t guarantee specific results or troubleshoot any issues that may arise.
Can I charge employers for listing job openings?
Yes, you can charge employers for listing job openings on your website if you are using WP Job Manager. You can implement different pricing strategies such as setting different bundled packages for different listing allowances, tiered pricing for premium listings, or subscription bundles for high-volume recruiters. This is possible using WooCommerce and WC Paid Listings.
You can also take a simpler approach and charge a flat fee for each job listing. This feature is available with Simple Paid Listings.
How do job seekers (employees) create an account?
Account creation flow will differ based on your Job Submission settings.
For example, if the Account required setting is left unchecked, non-logged-in users will be able to submit job listings without creating an account. If the Account creation setting is checked, non-logged in users will be able to create an account by entering their email address on the job submission form.
In Step 1 of the job submission flow, the first field in the job form shows the “Your account” row. The display of this field varies depending on your settings.
Please refer to the following guides for more information:
- https://wpjobmanager.com/document/getting-started/setting-up-wp-job-manager/#job-submission-settings
- https://wpjobmanager.com/document/getting-started/the-job-submission-form/#step-1-job-and-company-detail-fields
With WP Job Manager, can you add a company profile where job posters can edit company details?
No, but this is an improvement that is being tracked by the following Github issues:
https://github.com/Automattic/WP-Job-Manager/issues/1135
https://github.com/Automattic/WP-Job-Manager/issues/1086
If you want, it is still possible to disable the pre-filling of the company details by using a code snippet. See the following page for more details:
How can I upload my own PDF application form for job seekers to fill out on my website?
There are two ways to achieve this with WP Job Manager:
1. Using the built-in “URL” application method:
The core WP Job Manager plugin allows you to link to an external application form, including a PDF document. Here’s how:
- Go to the Job Listings section of your WordPress dashboard.
- Edit the specific job listing where you want to use the PDF form.
- Scroll down to the Job Data section.
- Paste the direct link to your PDF application form in the Application email/URL field.
2. Customization (requires development knowledge):
If you want a more integrated application process with your website, consider customizing the application process using code. This will likely require some development knowledge. Here’s a helpful resource to get you started: