Using the Simple Paid Listings plugin you can charge a single fee in order to list a job on your site using either Stripe or PayPal to collect the funds.
Please note that this plugin does not allow coupons, discounts, or anything other than a simple “pay $X for job listing”. If you need additional capabilities, please consider using WooCommerce Paid Listings, instead.
Installation
To install this plugin, please refer to the guide here: https://wordpress.org/support/article/managing-plugins/#installing-plugins
Setup
After installation, head over to Job Listings > Settings > Paid Listings to configure your paid listings + gateways:
- Listing Cost – Enter the cost of new listings, excluding any currency symbols. E.g. 9.99
- Currency Code – Enter your desired currency. For US Dollars, you’d enter
USD. For British Pounds Sterling, you’d enterGBP. Your chosen gateway (below) must support your chosen currency for it to work! - Payment Gateway – Choose ‘Stripe Checkout’ or ‘PayPal Standard’ as your chosen gateway. You’ll need a merchant account with your chosen gateway.
Stripe Checkout
Settings
- Secret Key – Integration API Keys are obtained from Stripe. Test mode requires test keys (prepended with
sk_test_). - Publishable Key – Integration API Keys are obtained from Stripe. Test mode requires test keys (prepended with
pk_test_). - Stripe has more information about using their testing mode here: https://stripe.com/docs/testing
PayPal Standard
- PayPal Email – Your seller’s PayPal email address.
- PayPal Identity Token – This token enables PayPal’s Payment Data Transfer which allows payments to be verified immediately. Setting this token is optional but recommended. You’ll need to access your website seller’s tools to get this token. You can find detailed information on how to do that in this guide.
Note: even though a “Return URL” field is required for Payment Data Transfer, it doesn’t matter what the URL is set to, as Simple Paid Listings won’t utilize it. The buyer will be redirected to the job submission template. - PayPal Sandbox – Enable PayPal Sandbox (used for testing). No live payments are taken when the sandbox is enabled. You can read more about Sandbox mode here.
Note: If you do not set up PDT, all payments will be marked as ‘on hold’ until they are verified by PayPal’s Instant Payment Notifications, which in some cases might take up to a few minutes.
Job Submission Flow
Up to the point of previewing your job, the flow is the same. However, on the preview page, you will notice that the ‘confirm’ button is renamed to ‘Pay for Listing’. This is where the magic happens.
With Stripe Checkout
Clicking “Pay for Listing” will open the payment page and prompt the user for payment:
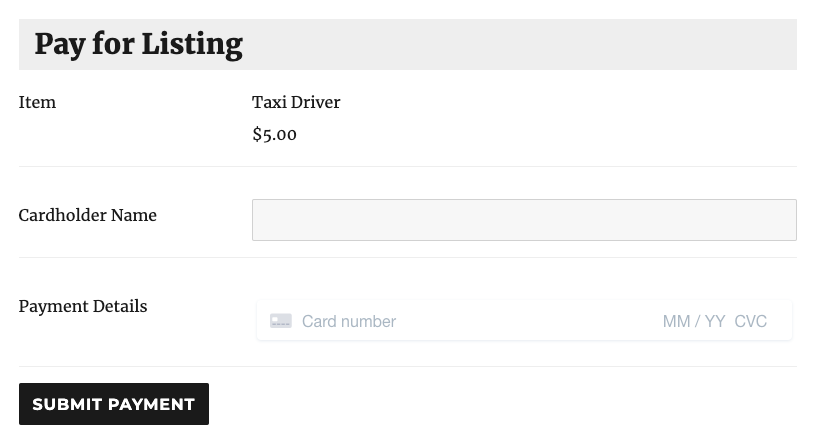
Once submitted, the page will automatically proceed.
If the payment is successful, the job will be marked paid and live/awaiting admin approval (depending on your settings).
If the payment fails, the preview page will be shown again with an error message, letting the user retry if they wish.
With PayPal Standard
Clicking “Pay for listing” will redirect the user straight to the PayPal payment page off-site. After payment, the user will be redirected to the job submission page by PayPal.

Upon return, the confirmation page will be displayed.
If you configured Payment Data Transfer (PDT) in the settings, the job should be marked paid immediately.
Otherwise, PayPal’s Instant Payment Notification (IPN) will be used, and PayPal will notify your site about the payment asynchronously.
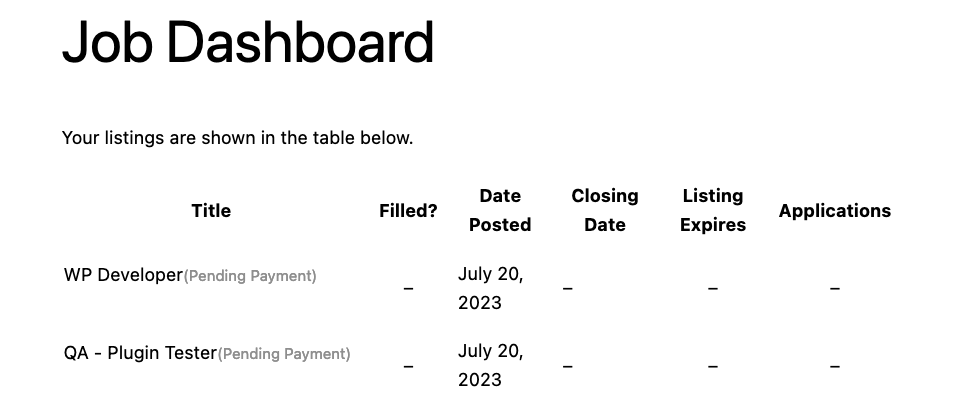
Important: PayPal’s IPN is the only reliable way to ensure that all payments will be verified. This means that PayPal must be able to access your host if you intend to use it. Simple Paid Listings register an endpoint at <your site URL>/job-manager-api, so make sure that a firewall does not block this endpoint. Failing to do so will cause payments and job listings to be on hold.
PayPal’s IPN verifications happen with a delay, which means that if PDT is not configured or if it fails, the submitted listing will have a ‘Pending Payment’ status until the IPN notification is received:
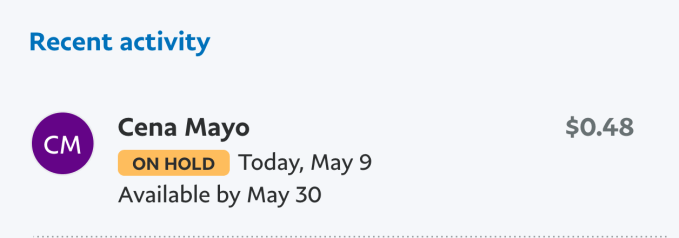
Additionally, in your PayPal account, the transaction/payment will appear as On Hold or Pending:
Once the IPN verification is received, the job will be marked as paid; depending on your settings, it will be published or awaiting admin approval.
Security/HTTPS
When using Stripe Checkout, it is still recommended that you set up your Job Submission page to be served over HTTPS, even though credit card details are never stored or transmitted directly from your server (stripe.js hashes them).
WordPress HTTPS plugin will help you do this – it’s an excellent plugin that can make any WordPress page secure (remember that you still need to buy and set up an SSL certificate from your hosting provider).
Troubleshooting
Note that Simple Paid Listings is not designed to be used simultaneously as WooCommerce Paid Listings. If you try to use both, you will encounter unexpected behaviour.