With the Job Alerts plugin, registered users on your site can create job alerts based on searches (by keyword, location keyword, category) delivered by email daily, weekly or fortnightly.
Note: the Job Manager Geolocation plugin adds Geolocation and Radius settings on the Alerts page and does not exist in the core WPJM plugin or any addons made by Automattic.
Installation
To install this plugin, please refer to the guide here: https://wordpress.org/support/article/managing-plugins/#installing-plugins
Setup
To get this plugin working, create a page and call it something like “My Alerts”. Inside the page content, add the shortcode:
[job_alerts]This will house the page where users set up and manage their alerts.
Once you set up your page, you can head to WP-admin > Job Manager > Settings > Job Alerts to configure the plugin’s settings.
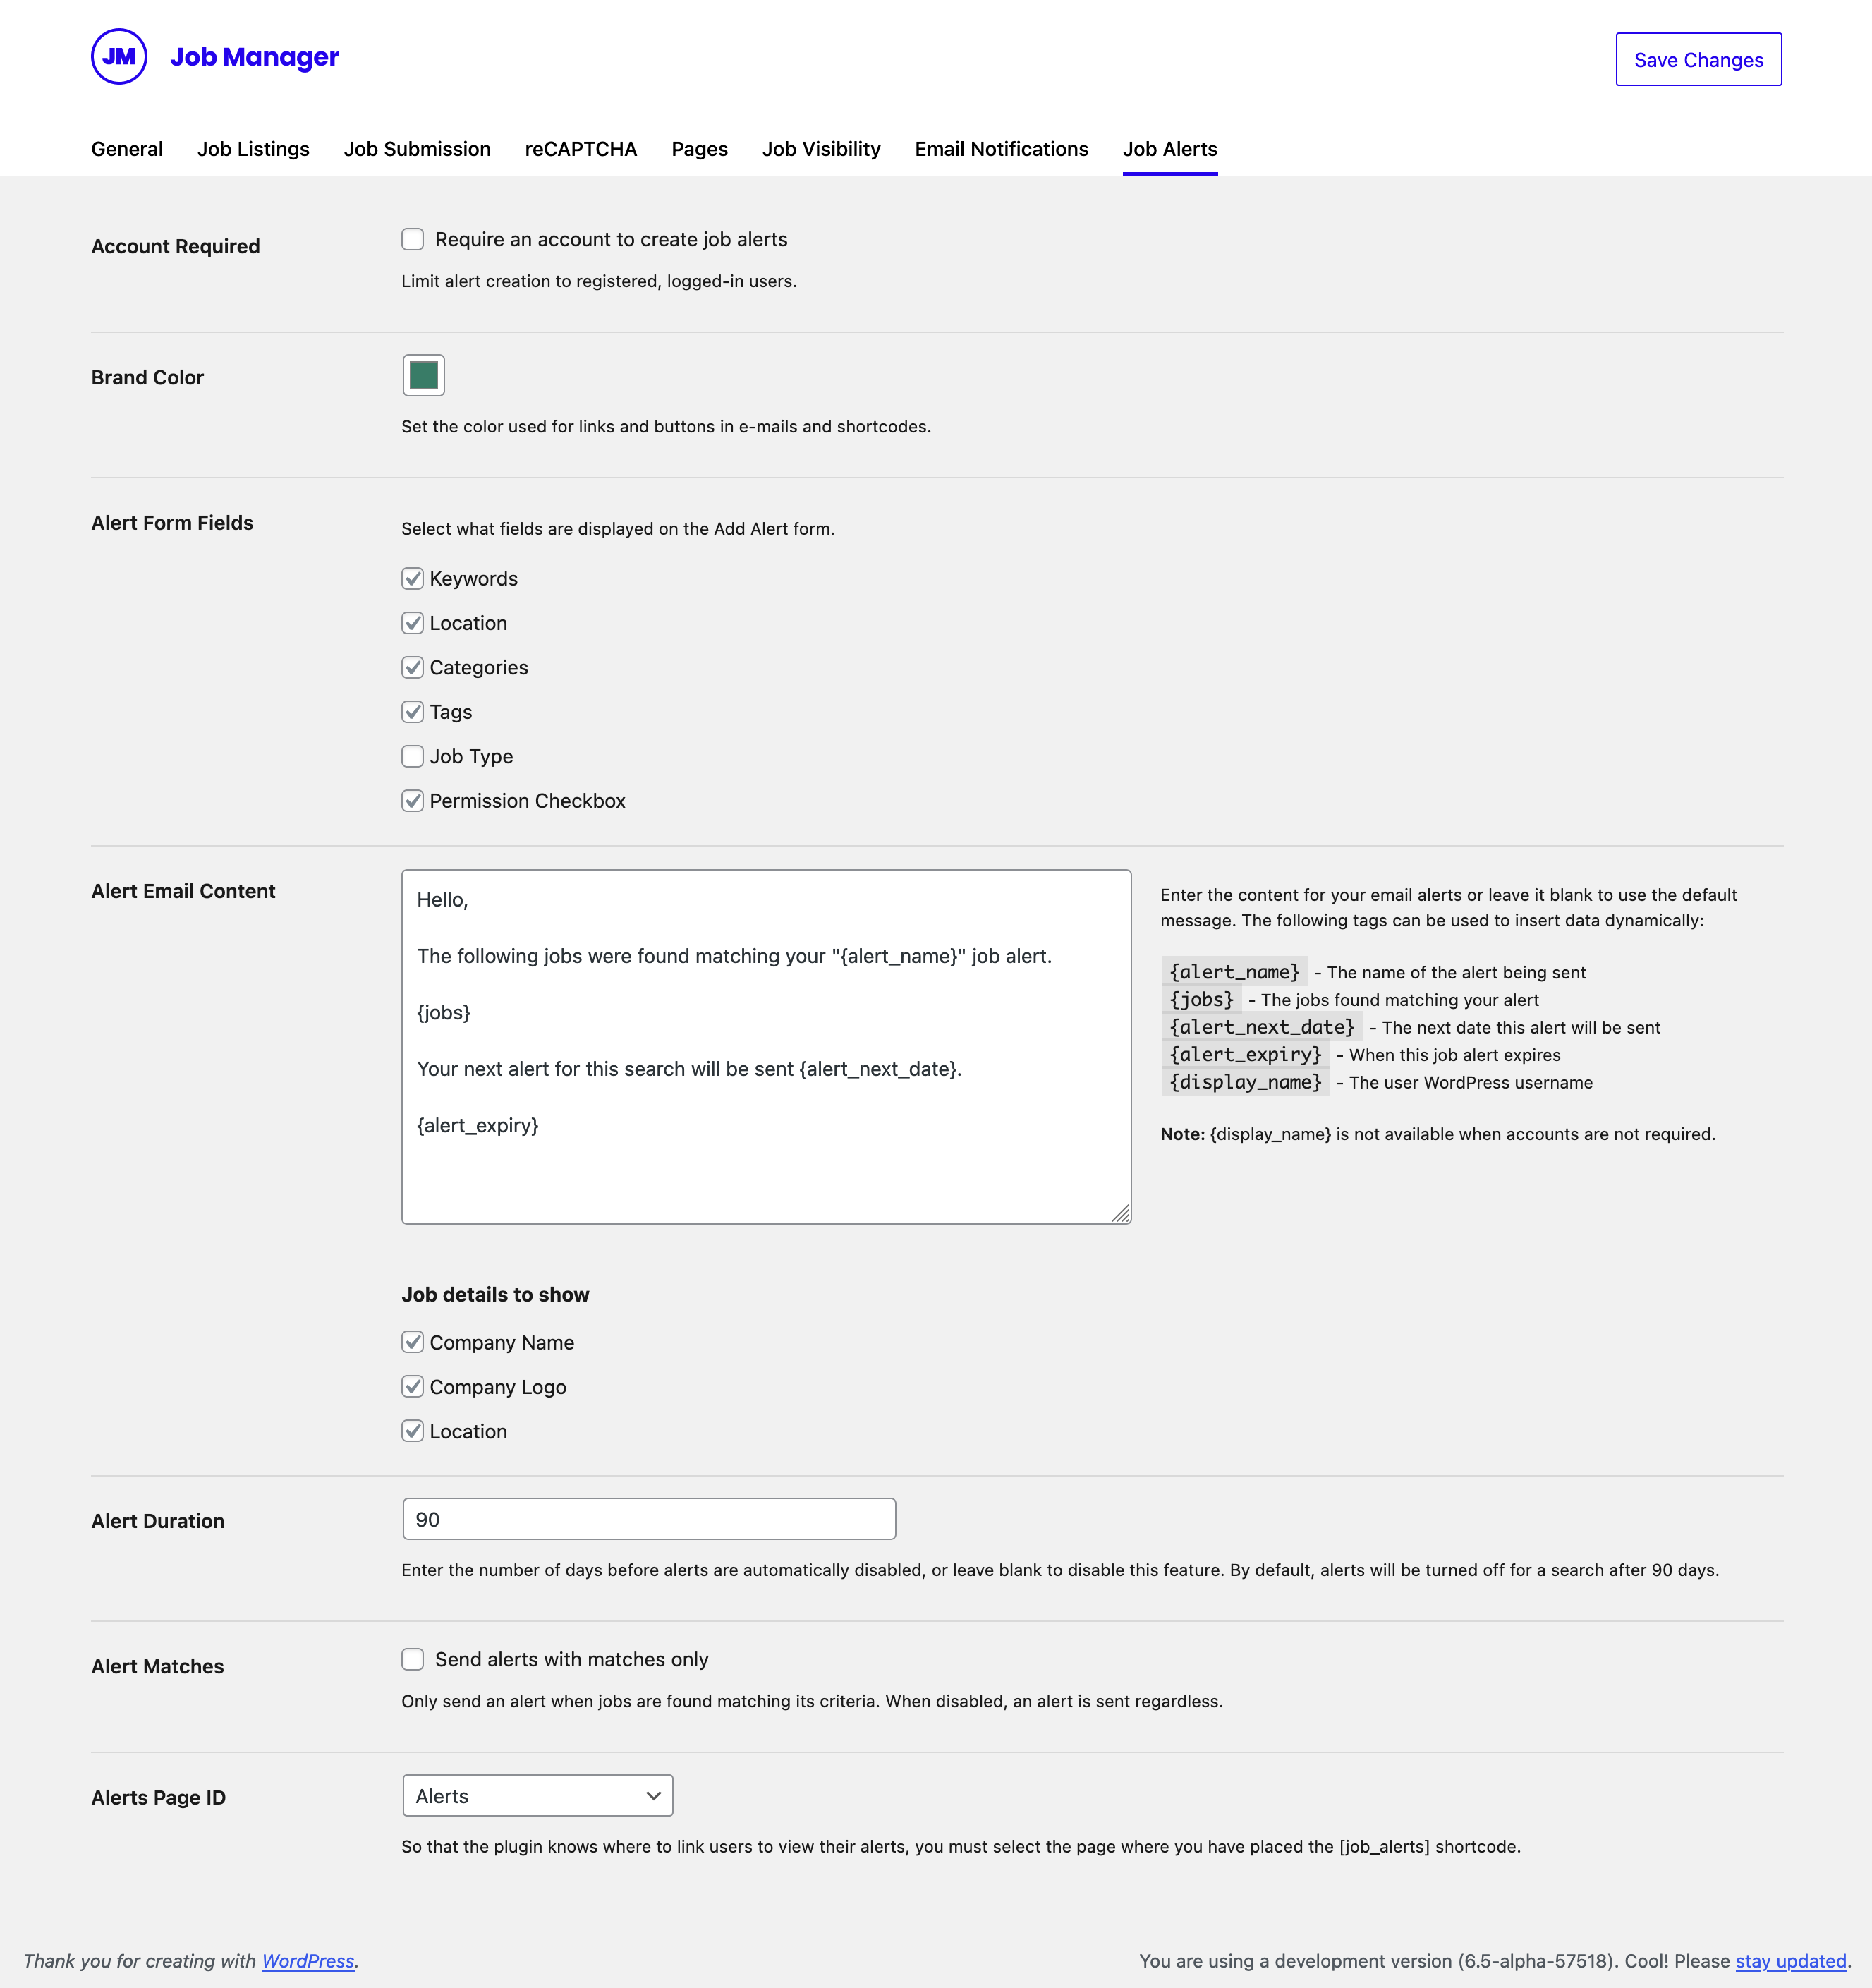
- Account Required – Configure requiring an account to create job alerts. If enabled, it will limit alert creation to registered, logged-in users.
- Brand Color – Customize the link and button colors used in the e-mails and shortcodes.
- Alert Form Fields – Select which fields in the job listings a user can set up alerts for. If job categories, tags or types are disabled or empty, they will always be hidden from alerts too.
- Current form fields allowed: Keywords, Location, Categories, Tags, Job Type, Permission Checkbox
- Alert Email Content – Customize the text content of the job alert emails. You can enter the content for your email alerts or leave it blank to use the default message. The following tags can be used to insert data dynamically:
{alert_name}– The name of the alert being sent{jobs}– The jobs found matching your alert{alert_next_date}– The next date this alert will be sent{alert_expiry}– When this job alert expires{display_name}– The user WordPress username
- Alert Duration – Entering a number here will cause a user’s alerts to expire are X days. When it expires, the user can log in to their alerts page to re-enable them for another X days.
- Alert matches – Enable the option “Send alerts with matches only” to ensure that an email is only sent if jobs are found that match your alert. If this is disabled, an email will be sent every time the alert is checked, even if there are no matches.
- Alerts Page ID – Select the page where you have placed the
[job_alerts]shortcode so the add-on knows where to link users to view their alerts.
Using Job Alerts
Creating an Alert
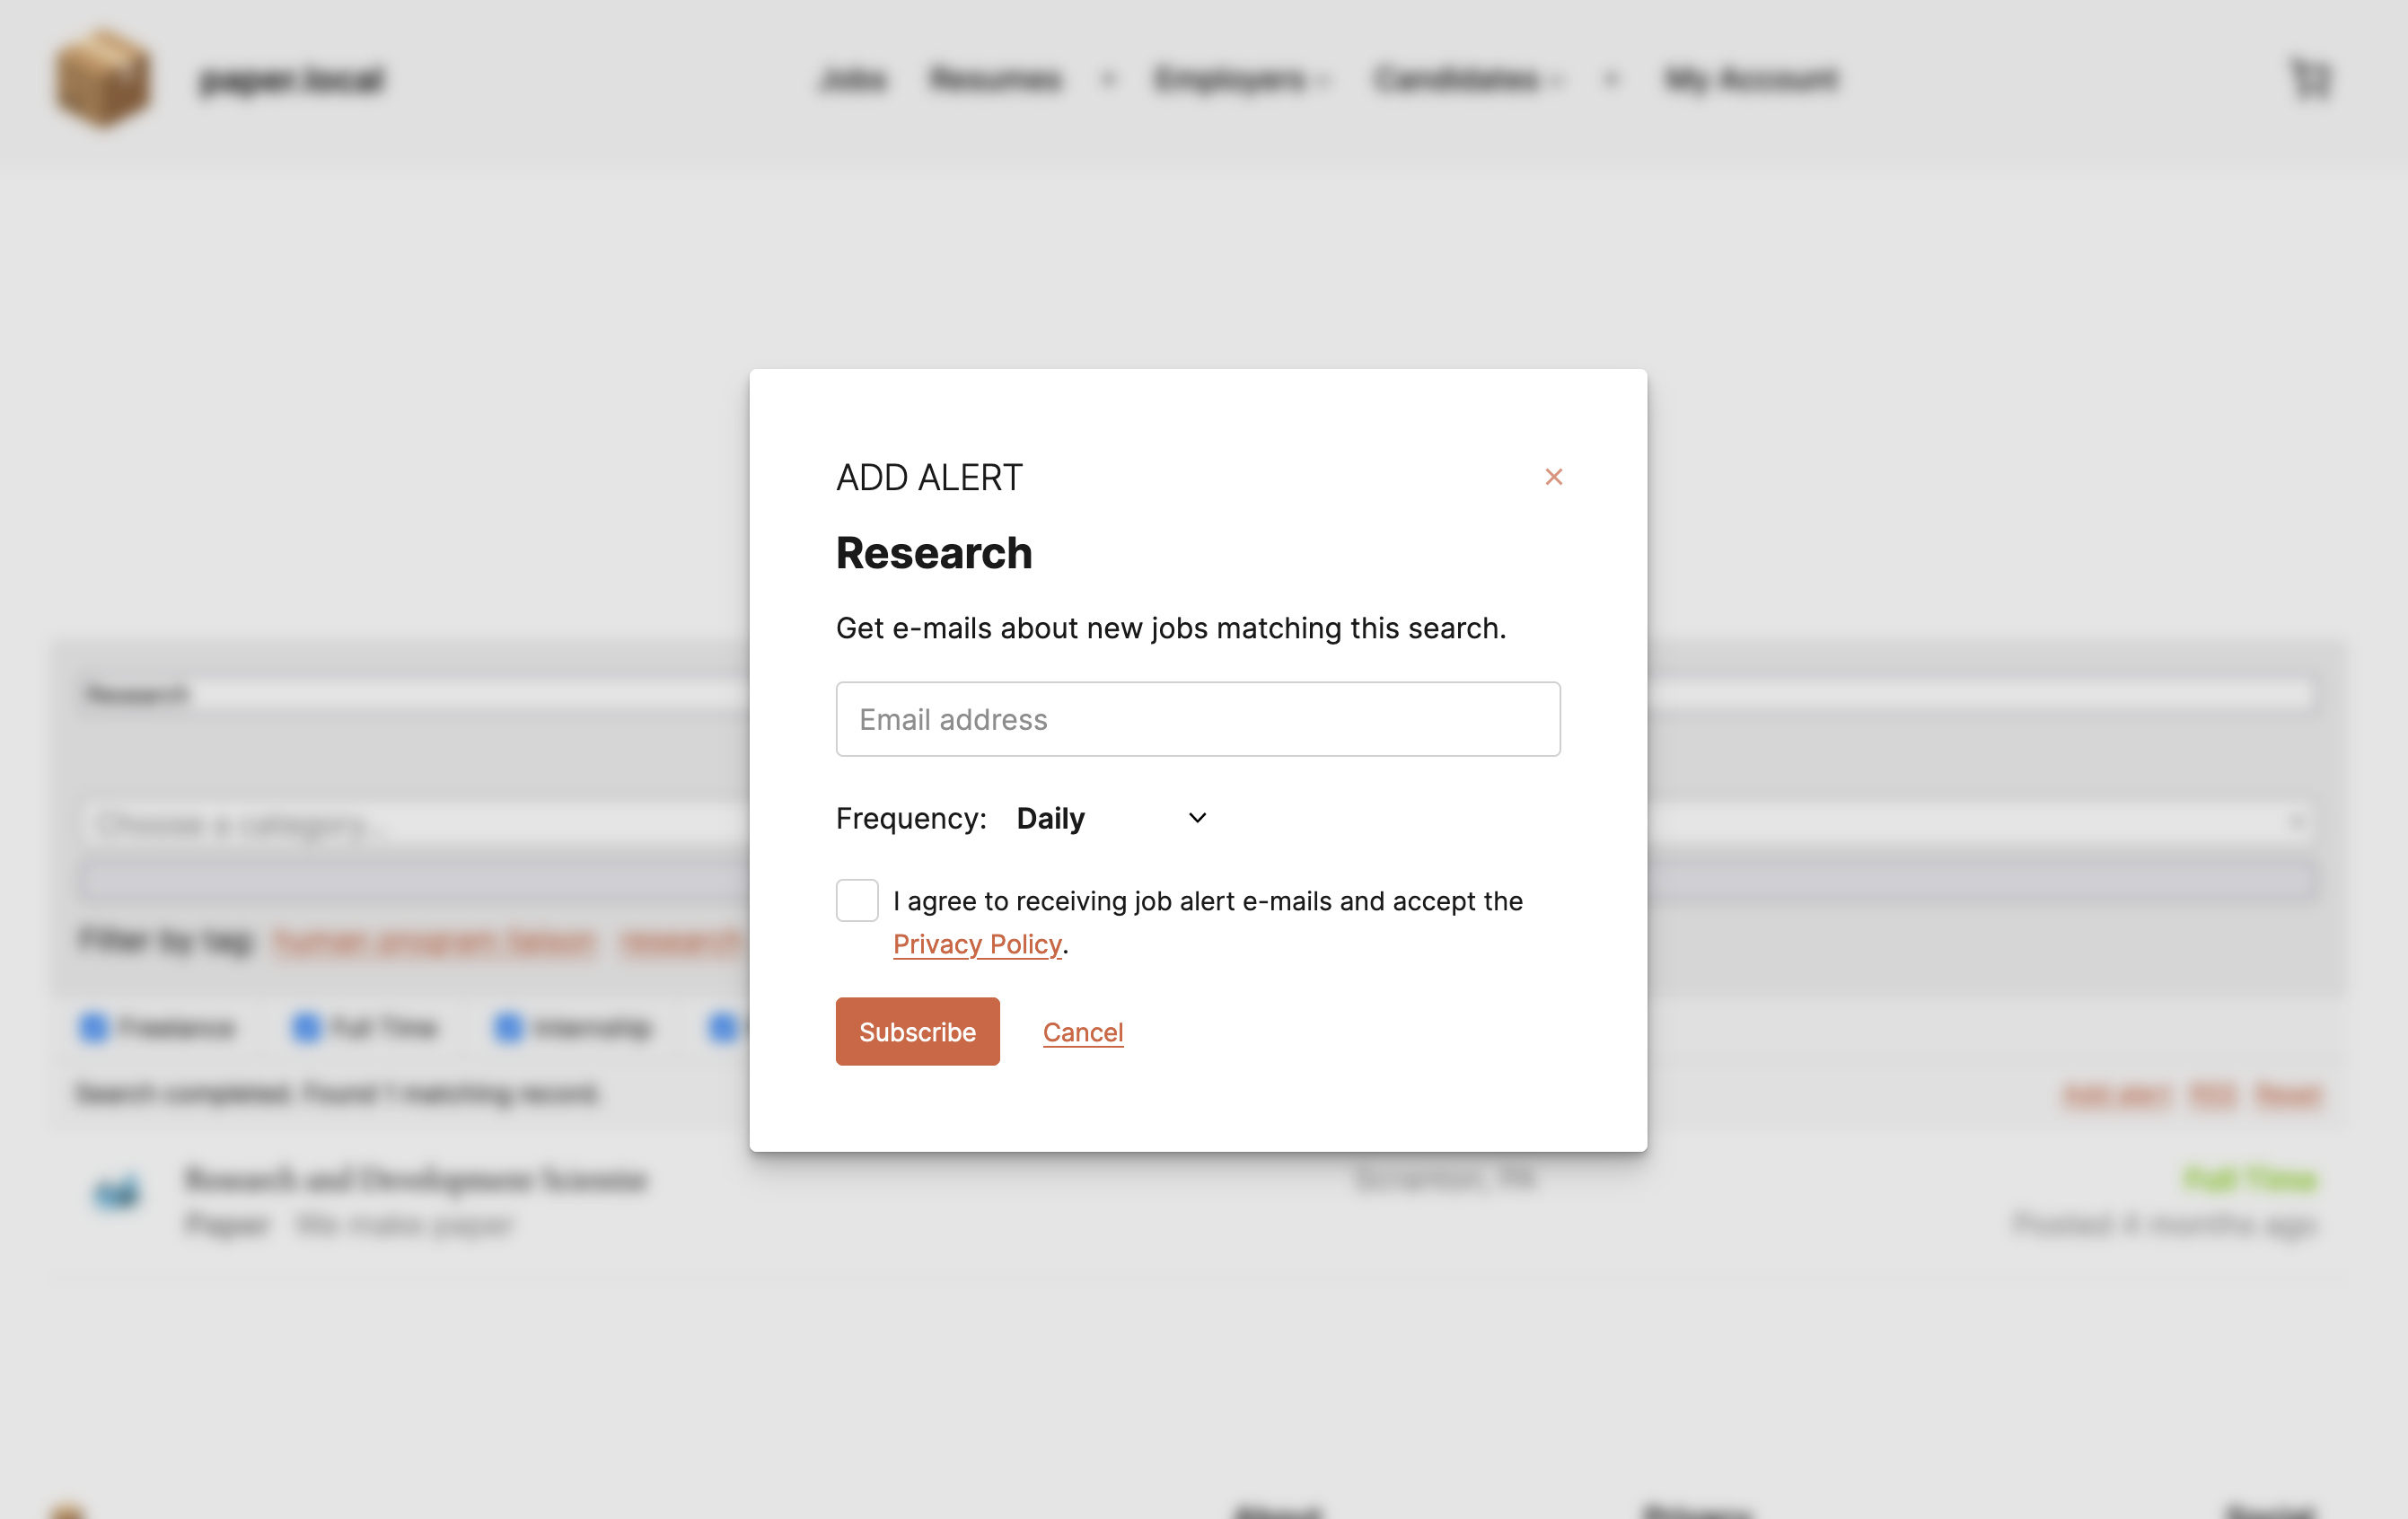
When visitors search for jobs on the page with the [jobs] shortcode, they will see an “Add Alert” link among the secondary actions. Clicking this link will open a modal where they can provide their e-mail (if logged out), set up alert frequency and confirm the alert subscription.
Receiving E-mails
Subscribers will receive regular e-mails according to the schedule they set. E-mails will contain new jobs only — jobs listed since their last e-mail for that alert.
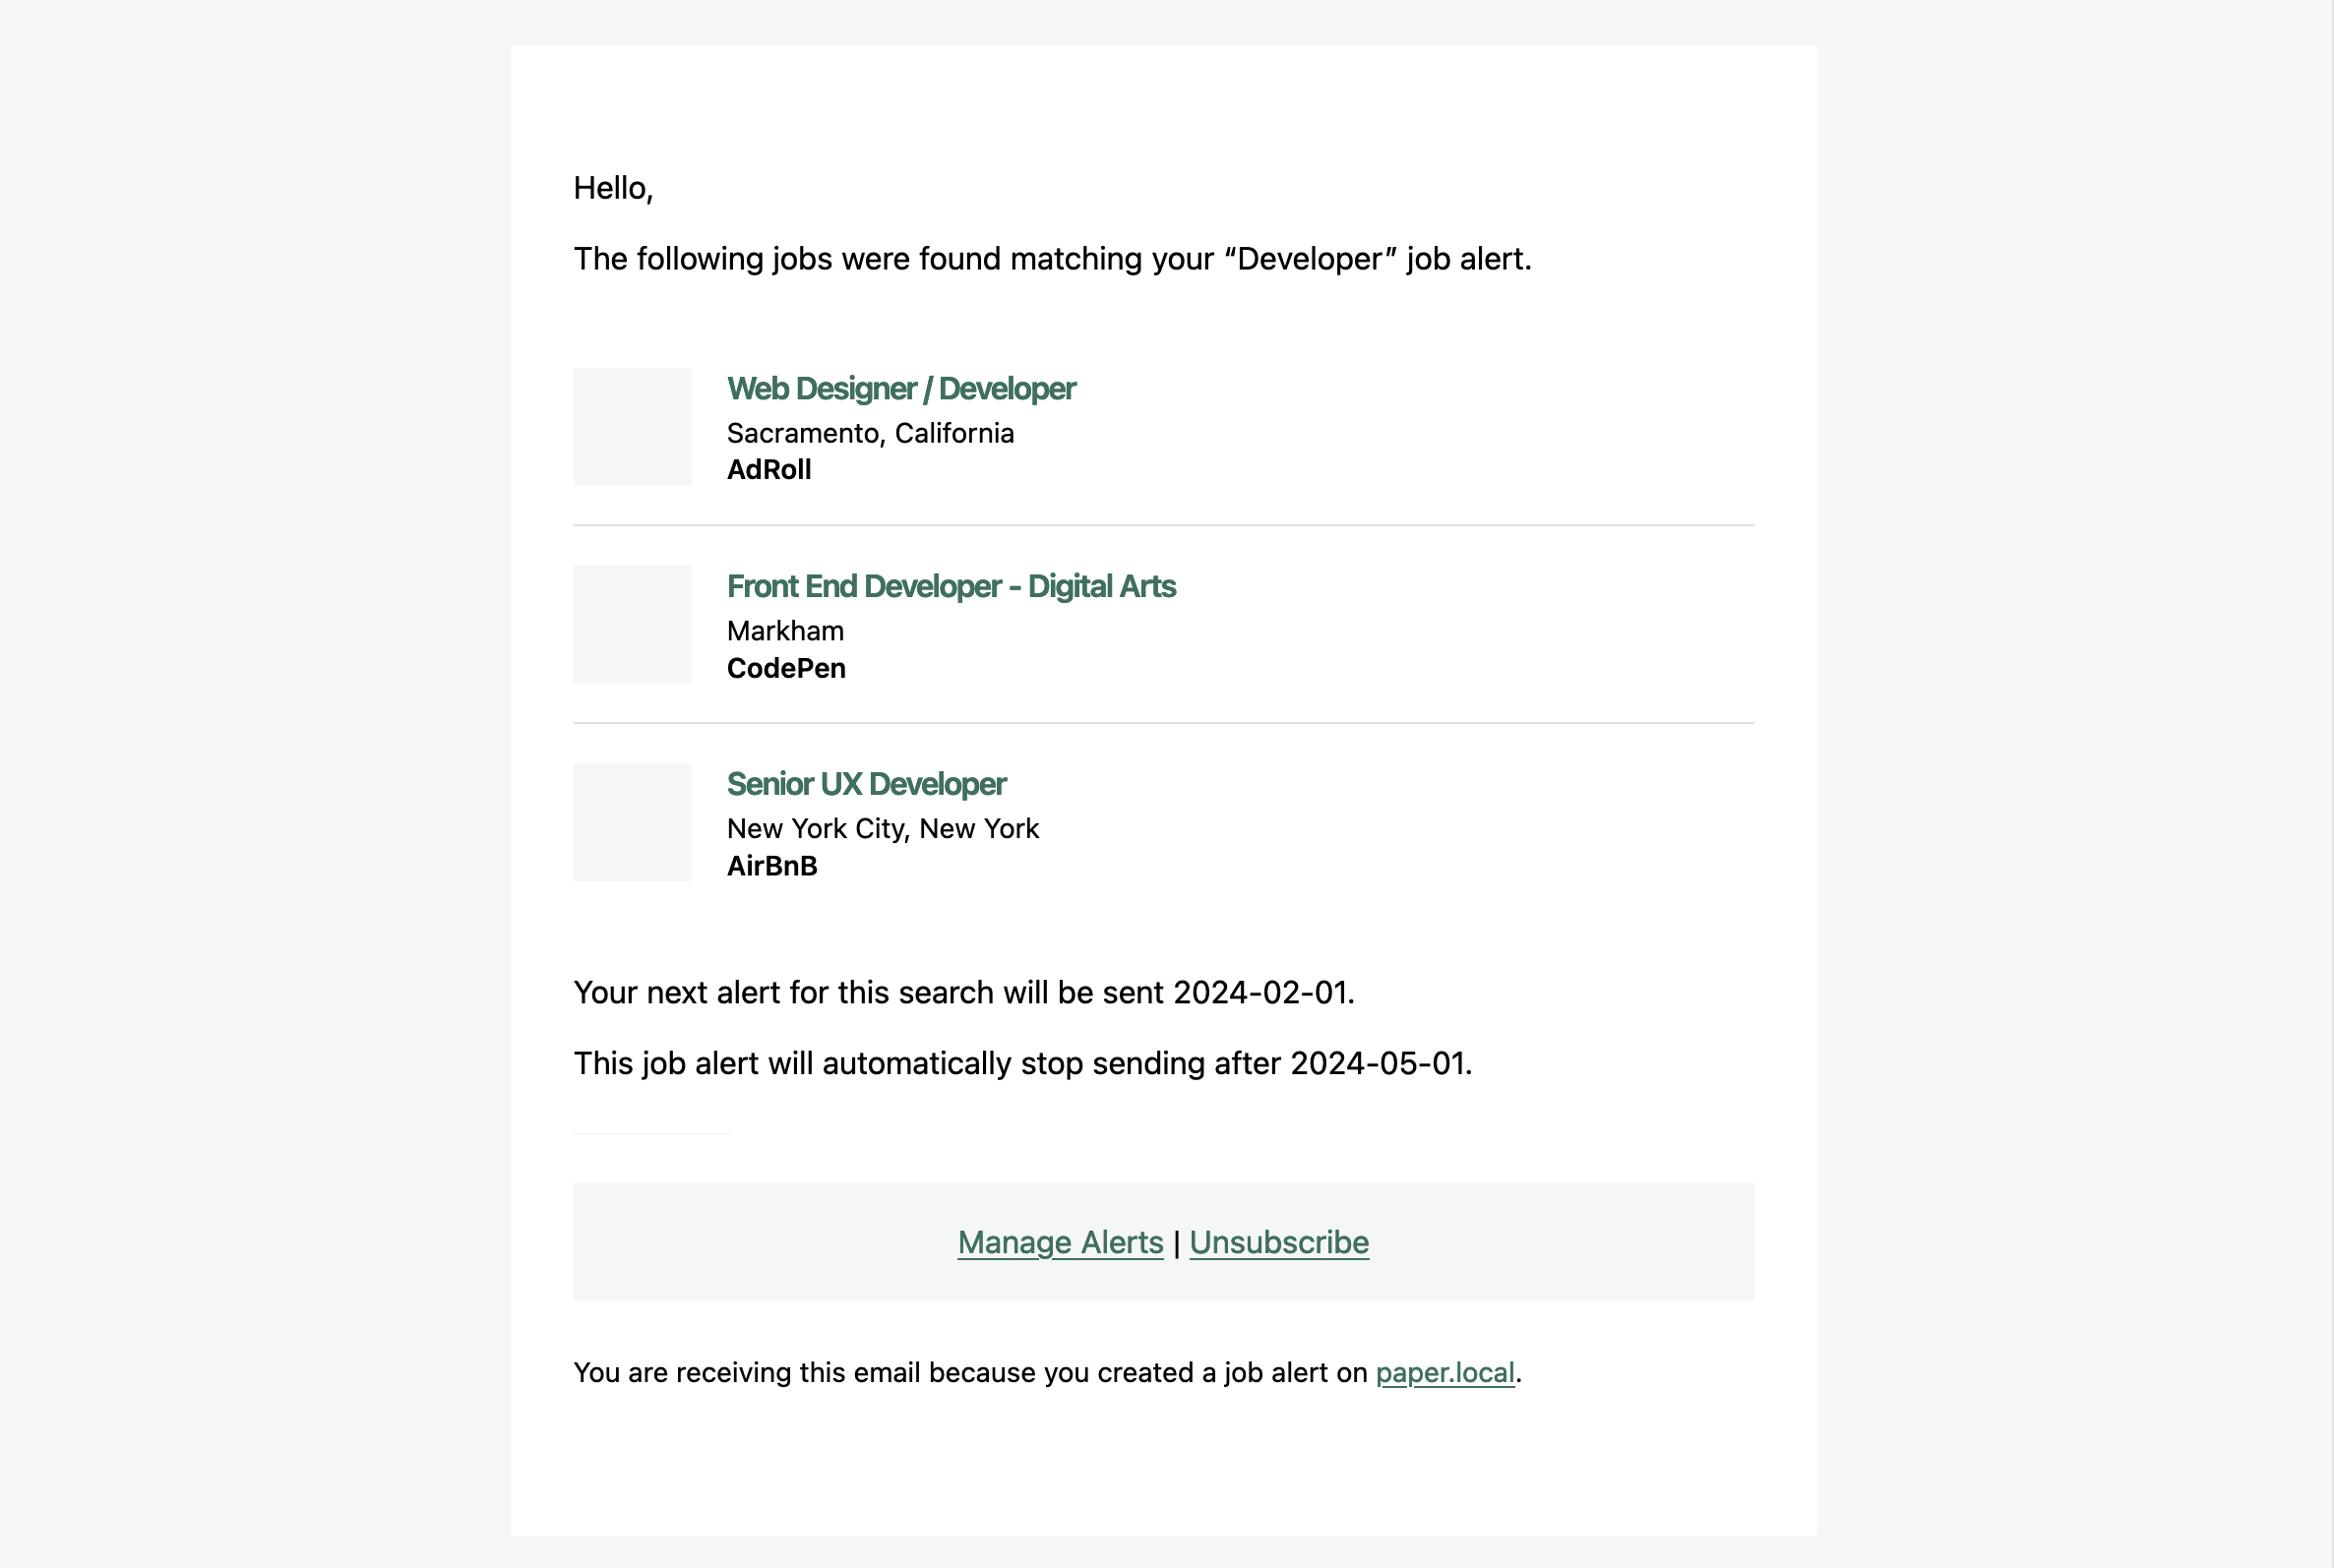
The e-mail footer contains links to manage or delete the particular alert.
When accounts are not required, these links contain a magic token that verifies to the My Alerts page that the user can manage alerts for that e-mail address.
Managing Alerts
The my alerts page (which you set up above) will list any alerts they have set up, and let them edit them or add new ones.
For unregistered users who open this page from an e-mail sent to them, they will see all the alerts set up for their e-mail.

Alerts have the option to:
- Check the results
- Send the alert
- Edit the alert
- Disable the alert
- Delete the alert
Site Admin
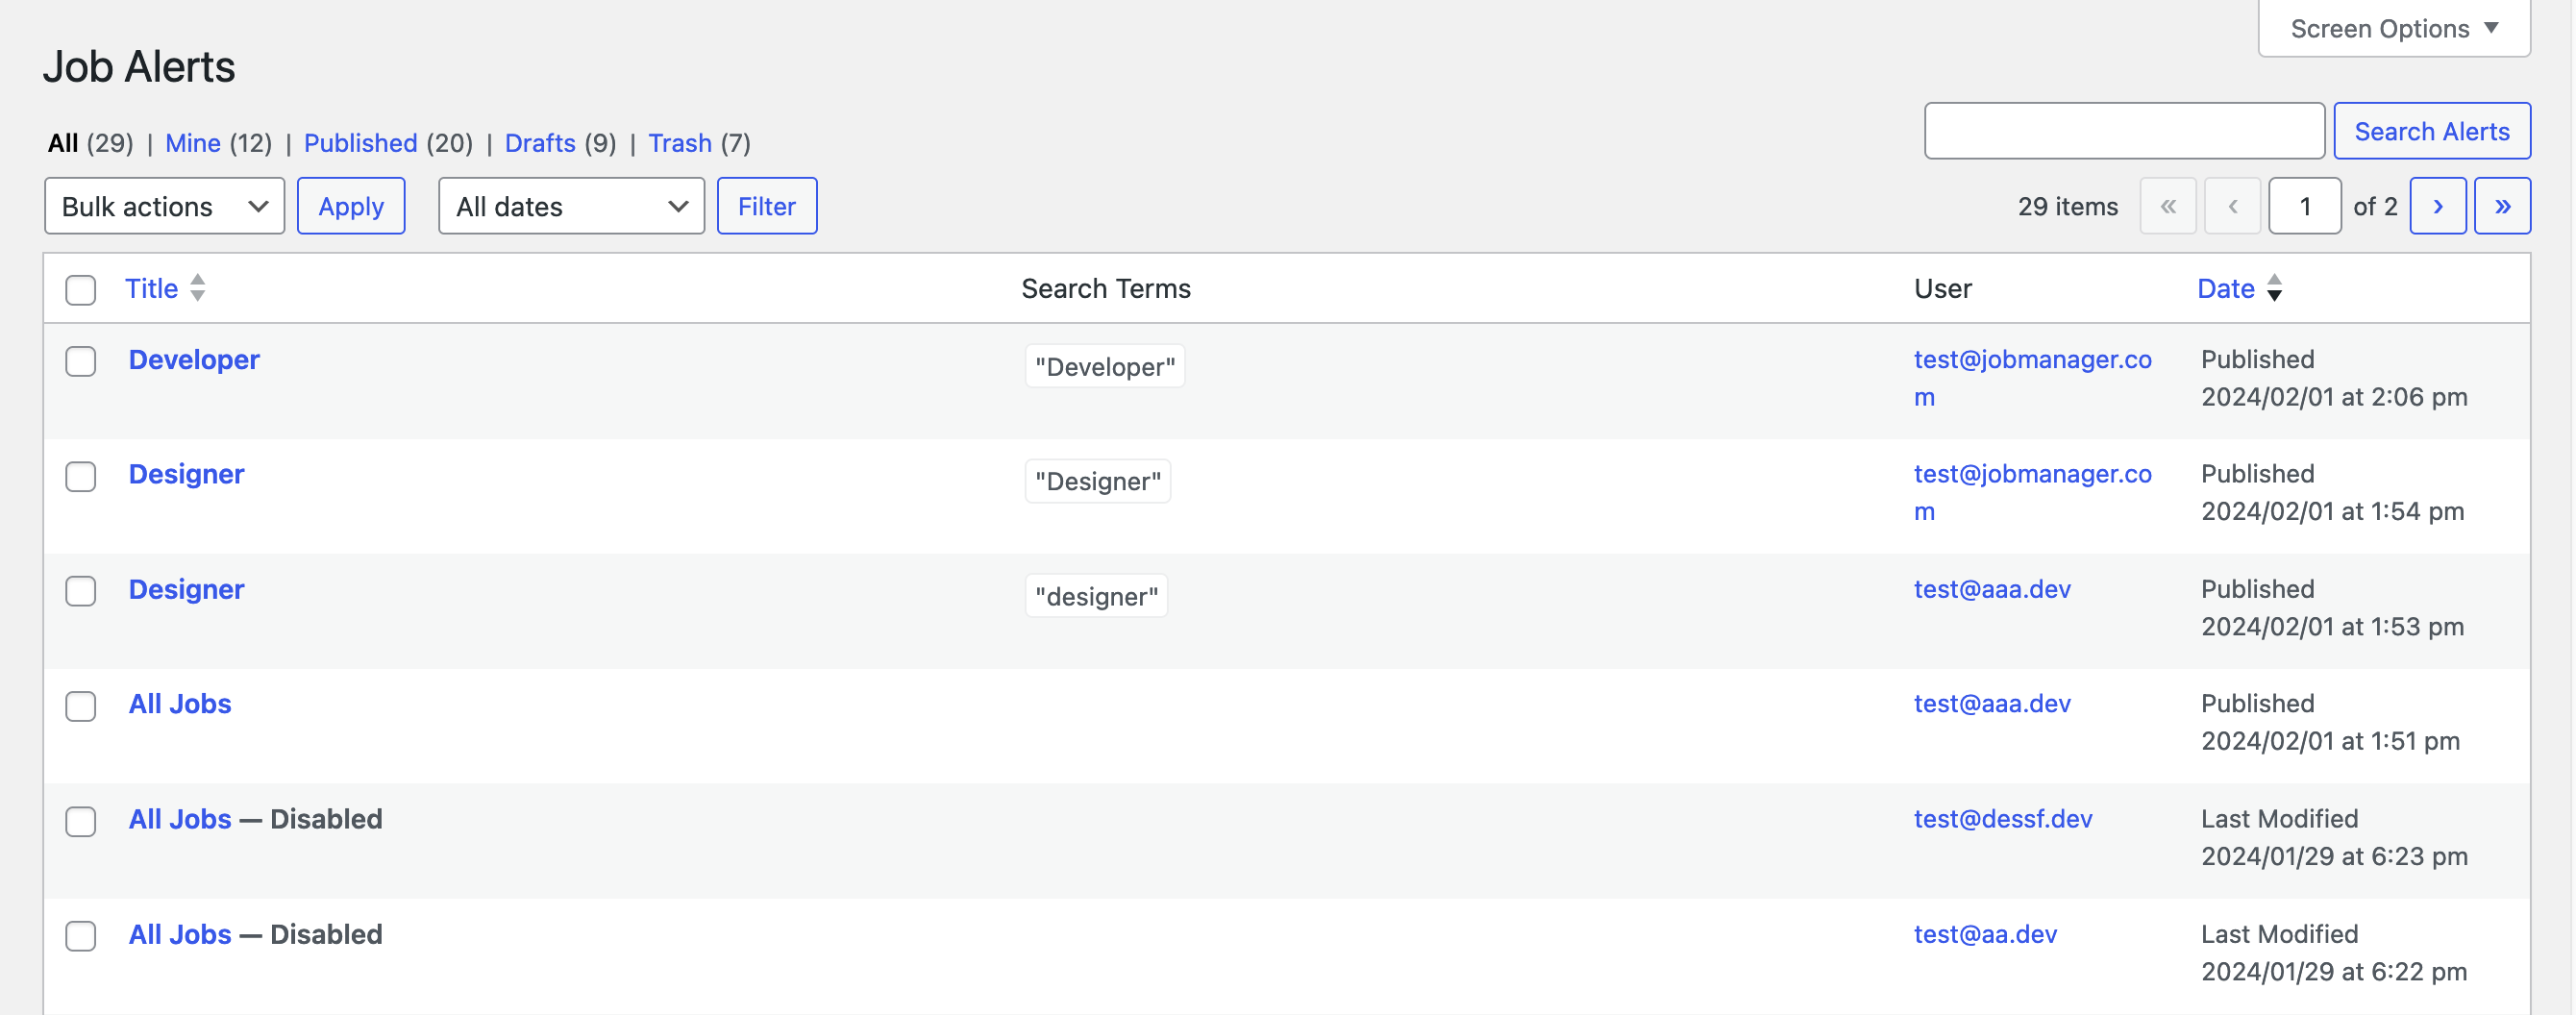
The Job Alerts dashboard only allows you to view or moderate existing alerts, and can be accessed under Job Manager -> Job Alerts:
As for the specific fields you can choose from, alert_frequency can have the values daily, weekly, fortnightly, and monthly.
These can be further customized by using job_manager_alerts_alert_schedules filter – read more about that on the Job Alerts snippets page
How Alerts Are Sent
Once an alert is created (or enabled) a WordPress cron event will be scheduled. When this event is triggered, the alert will be sent and another cron will be scheduled. This process will repeat while the alert is active.
Different Results when using Send Now vs scheduled emails
Only job listings created after the previous email schedule, will be included in the next email. This is to prevent sending the same job listing multiple times.
For example, if the alert is set to daily, and the last email was sent out on 1 January, only job listings created after 1 January will be included in the 2 January email.
This differs to using Send Now button in the Alerts page. The Send Now email will include all job listings that matches the filter, regardless of when the listings were posted.
Troubleshooting
“Add Alert” link is not displaying
Please check that you followed the setup instructions above. Note that you first need to add a page containing the [job_alerts]shortcode before the “add alert” link will display on the jobs page.
Ensuring cron jobs are triggered for low traffic sites
WP Cron jobs are triggered when the site is visited by a user or bot. If you want cron jobs to trigger more often or more reliably, consider this tutorial for setting up a ‘real’ cron job.
Emails aren’t getting sent
Ensure WP cron is not disabled if you are not using ‘real cron’, as mentioned above. Check for this in your wp-config file:
define('DISABLE_WP_CRON', true);If you see that line, remove it, or set it to false..
Please also see our troubleshooting for email.
Wrong “from” email address
Alert emails are set up to be sent from “noreply@yourwebsite.com“ by default.
However, with some hosts, if this address doesn’t exist as a mail account on your server, then it may be replaced, so you will find alert emails being sent from an email address belonging to your hosting provider.
If this happens, you can fix it by creating a mail account with your host for “noreply@yourwebsite.com“
FAQ
Can you set up an alert based on other fields such as Salary?
Currently, the Job Alerts add-on does not support the salary field. If you’d like to set an alert based on the field(s) not supported by the Job Alerts add-on, please submit a ticket for a feature request.
Customizing the Alerts Form
Please note that we cannot provide support for customizing this plugin.
Make sure to check out how to override templates.
The templates you can override for Job Alerts are:
../wp-job-manager-alerts/templates/alert-form.php, which is the form used when creating a new job listing alert from the my alerts page.
../wp-job-manager-alerts/templates/add-alert-modal.php, which is the modal used when creating a new job listing alert from the job search page.
../wp-job-manager-alerts/templates/emails/ contains templates which generates the content used in the Alerts notification email.
../wp-job-manager-alerts/templates/my-alerts.php, which displays the job listing alerts, on the page containing the `[job_alerts]` shortcode.