
Standing out in the crowded job market is more important than ever before. You need to do something to get your job listings out there for as many people to see as possible. At the same time, you want to attract high-quality candidates to fill the positions.
It sounds like a big challenge, but the trick is learning how to use job posting structured data to enhance rankings in search results. Your jobs will be seen by more people – and they’ll be seen by the right people too.
This DIY guide will teach you how to get high-value candidates to fill vacancies by utilizing job posting structured data and Google Job postings in WordPress. So, let’s get stuck in!
About Job Posting Schema Markup
The Job Posting Schema Markup is a type of structured data that improves the way job postings are detected by search engines. You add it to your pages to provide more information about the content on that page.
Effectively, it’s a way of labeling and organizing information about job listings. The job posting schema markup includes adding things like the job title, job description, location, and salary.
As a result, search engines quickly pull this information from web pages and understand what it’s about. Thus, the listings are shown more prominently if a job seeker runs a Google search for jobs relevant to the ones you’re listing.
There are plenty of benefits of implementing job posting structured data, such as
- Boosting search result visibility by improving SEO.
- Making your listings more attractive by showing more information during searches.
- Generating more clicks by job seekers as your listings are more detailed and informative.
- Improving the chances of your target job seekers finding your listings.
Clearly, there are many reasons you should implement job posting structured data on your website. It’s also worth noting that the Job Posting Schema Markup follows the Schema.org standard. This is a collaborative effort between Google, Bing, Yahoo, and Yandex to create basically create a common language for all websites to use to describe the content on their pages. Again, it’s all about making it easier for search engines to find the right content – in this case, we want them to find your job listings.
To implement the Job Posting Schema Markup, you need to add these properties to the HTML code of the job posting page:
- Job Title
- Hiring Organization: What’s the name of the company listing the job?
- Job Location: Where will the job take place, or is it remote? Be detailed with this.
- Date Posted
- Valid Through: How long will the job posting be active? State when it will be removed.
- Employment Type: Is it full-time, part-time, contracted, etc.?
- Job Description: What does the job entail? List all the responsibilities and requirements.
- Base Salary: What’s the starting salary or salary range for the job?
- Job Benefits: What employee benefits are provided?
- Job Qualifications: What qualifications are essential for the job? Include professional qualifications, education requirements, and so on.
- Application Instructions: How can the applicant apply for the job? Include details of any forms or documents required.
When going into the code, you have to use the right terminology to structure the data accordingly. It will be done via the JSON-LD linking data format. This is the easiest for humans to read and write, and most websites utilize JSON-LD in one way or another. It involves using tags like “Addresslocality”, ”Addressregion”, ”postalcode”, ”streetaddress”, and ”addresscountry” if you’re providing info on the job location.
At the moment, all of this can seem quite complicated. You’re probably wondering how you find the HTML code or what HTML code even is. Don’t worry; there is a very easy way to implement job posting structured data that follows the Job Posting Scheme Markup – and we’ll walk you through all the steps in the next section.
Implementing Google Job Postings on WordPress
The best way to implement Google Job Postings on your WordPress website is through the WP Job Manager plugin. This is a free plugin that anyone can download, and it comes with Google Job Search Integration.
This means the proper schema for making job listings compatible with Google Job Search requirements is automatically available. In simple terms, the properties are added to the HTML code of the job posting page for you! So, you don’t need any coding skills whatsoever. It’s very straightforward, and here are the steps to download the WP Job Manager plugin and create your job listings:
Step 1: Go to the plugins tab on your WordPress dashboard (the small icon that looks like a plug) and click Add New. Search for WP Job Manager and click to install and activate.
Step 2: You’ll then be prompted to set things up using the setup wizard. Click to do so, and you’ll be presented with a page that informs you that WP Job Manager is installed. Click the blue button that says Start Setup.
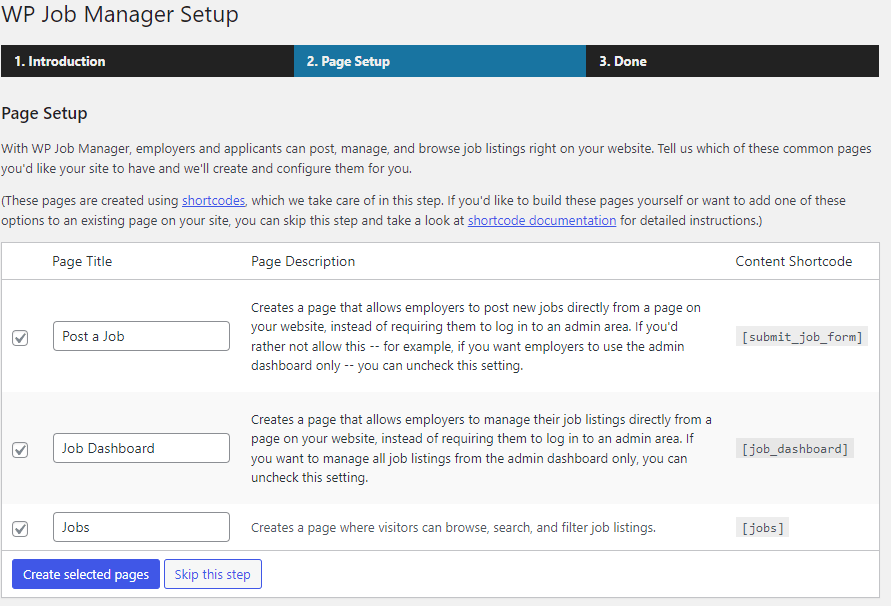
Next, there’s a Page Setup page where you choose which pages are created for your site. Just tick all of the boxes to ensure you have pages for Posting A Job, Managing Jobs, and Viewing Jobs.
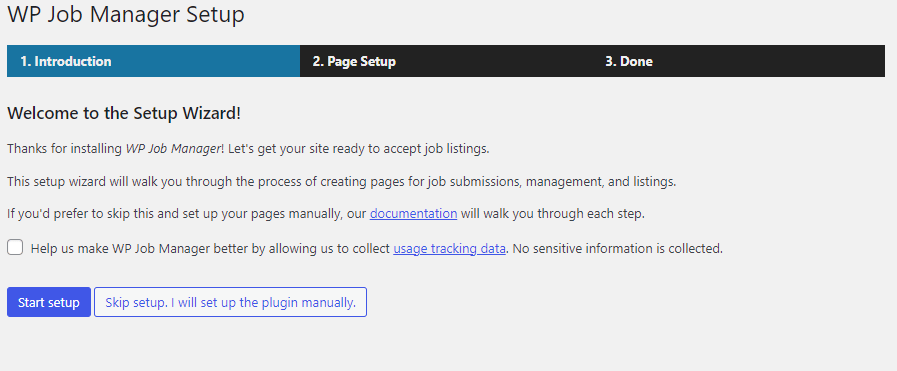
Step 3: Once you’ve got the pages set up, you can click through to the final page, which confirms everything is up and running.
Creating jobs in WP Job Manager
Now, you’re ready to create some jobs. It’s very simple, and all of the job posting structured data is included in the listing for you. Here are the steps to follow:
Step 1: Go to the Job Listings tab (it has a small folder icon) and click Add New. You’ll be presented with the following page:
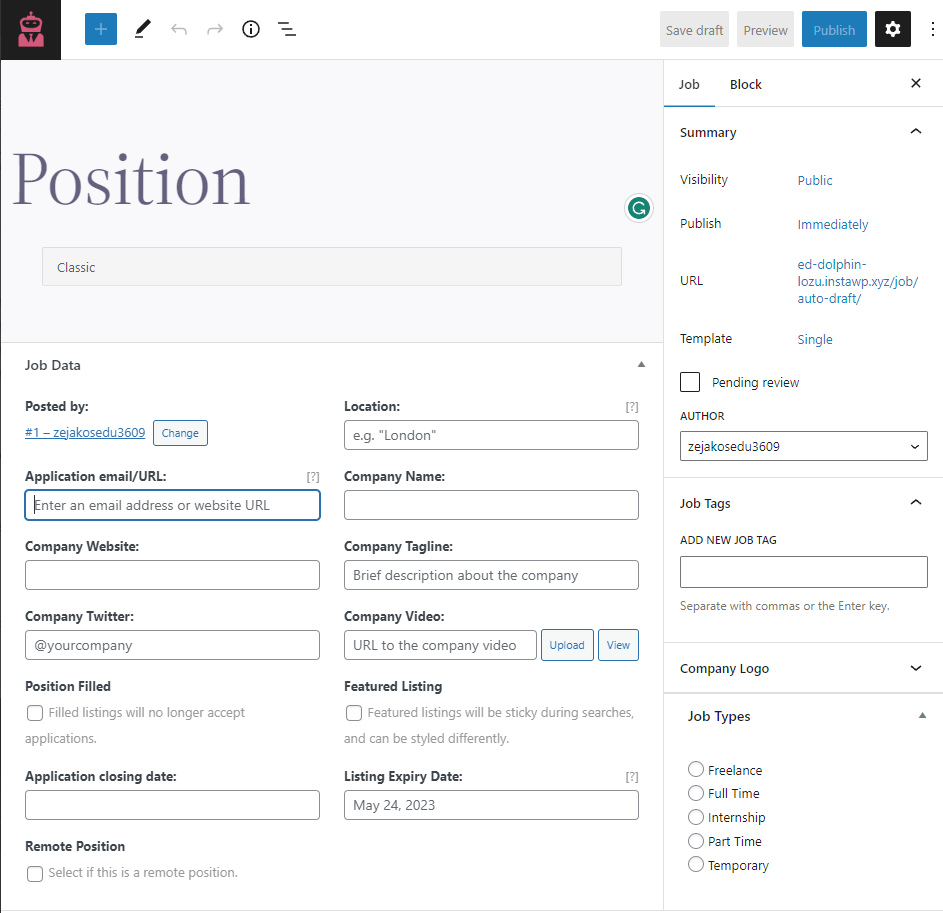
Step 2: Fill in all the sections on the job listing page. As you can see, all of the information needed for the Job Schema Markup is included here. Fill it in with as much detail as possible to improve the chances of your listing being found on Google.
Step 3: Preview the job to see how it looks. If you’re happy, click Publish – don’t forget to select
the Job Type on the right-hand side before doing so. A published job will look like this:

Just like that, you have a job listing that search engines can find as it uses the right job listing structured data. And you achieved it without looking at any coding at any point – it’s all automatically done via the WP Job Manager plugin.
Customizing job listings for maximum visibility
Once you’ve listed jobs, there are ways to customize them for maximum visibility. To implement these strategies effectively and create job postings that truly stand out, it’s essential to dive deeper into the craft of writing a job posting. For a comprehensive guide on crafting job listings that attract the right candidates, be sure to check out our recent insights on writing a job posting that stands out.
The first step is to look at what you’re writing. Here are a few tips and tricks to craft better content for search engines to find:
- Create effective job titles: Include keywords in job titles so the right candidates (and search engines) find them with ease. Always ensure the title is relevant to the job as well!
- Write optimized job descriptions: Include keywords in your job descriptions as well. This is the best place to add some keywords people might be searching for, such as tasks the employee might need to do, industry terms, etc. It makes it easier for search engines to find and rank your listing.
- Make it easy to apply: Offer details on the application process alongside your description of the job. Make it easy for candidates to apply, and you will further improve visibility. It’s great for SEO as it adds to the job search experience for the user. When Google sees sites that are user-friendly, it makes them more visible.
- Focus on the location: As well as including the location as part of your listing, you should add some location-specific keywords to the job description – and in other places throughout the listing. It helps jobs appear to people in the right areas.
- Ensure your posting is mobile-friendly: A whopping 70% of job searches start on mobile devices. Not only that, but Google penalizes websites that aren’t mobile-friendly. If your listing isn’t optimized for mobile devices, it won’t be seen. Luckily, WP Job Manager automatically creates responsive job listings that work across all devices.
- Optimize job posting URLs: This is another classic SEO trick that most people forget. Edit the job posting URLs so they include your primary keywords, are easy to read, and describe what the page is about. Don’t run with default URLs containing lots of numbers and letters, as they won’t rank well.
- Add an FAQ section to the job listing: A FAQ section is another way to get more keywords in your listing for optimal SEO. However, it’s also a chance to get your content in the Snippets section of a Google search. Write some common questions people may have when applying for your jobs. Create succinct replies (using bullet points if possible), and your answers may appear in Featured Snippets when job seekers are typing these questions into Google.
There are also some paid add-ons that WP Job Manager offers to further aid visibility. These include:
- Job Tags: Enables you to tag jobs with required skills so users can find them using filters.
- Applications: Lets candidates apply for jobs using a form, and gives employers the ability to view and manage applications via a dashboard.
- Application Deadline: Lets you set a closing date on a new field on the job submission form.
Many others are available, and you can get all of the Core Add-Ons in a bundle for just $159/year.
Optimizing job listings for niche industries and freelancers
WP Job Manager can be used to optimize job listings for niche industries and freelancers. This is thanks to the plugin’s built-in support features for job locations, categories, and taxonomies.
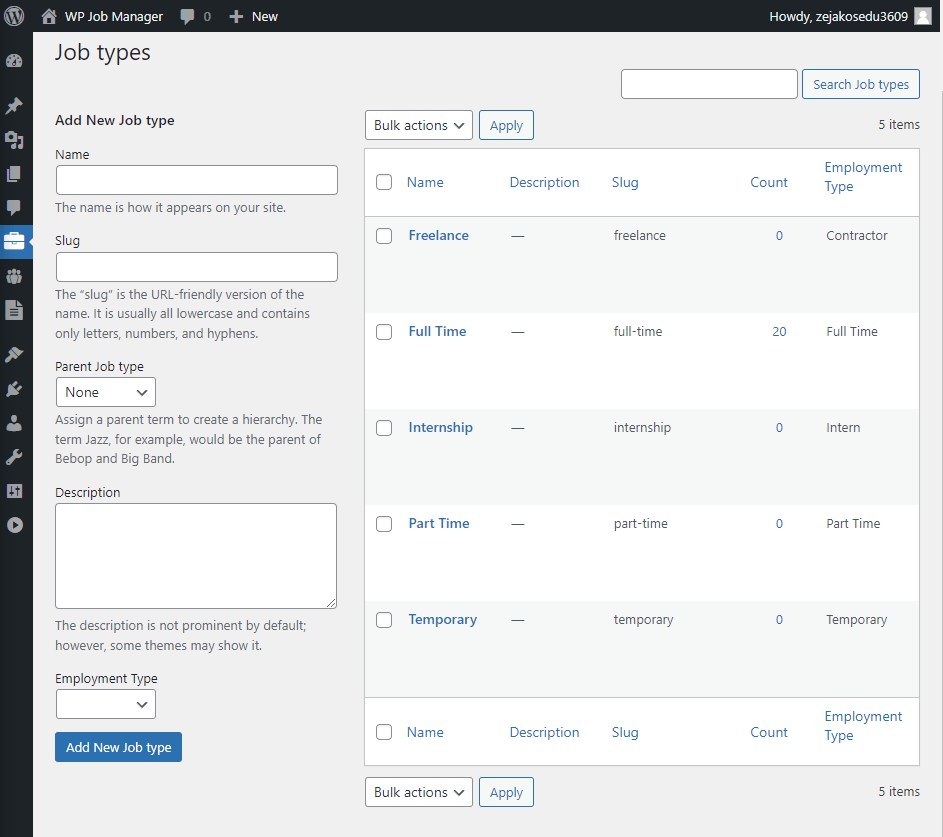
The best place to start is with the Job Types. Head to the Job Listings tab and select Job Types. You’ll then be shown a page that lets you create different job types based on employment. This means you can set jobs as Freelance or Temporary for self-employed individuals. You can create Contract job types for freelancers as well. It just helps you make a site that caters to niche job seekers rather than people looking for standard full-time or part-time work.
There’s also a feature on the Settings page (Go to Job Listings > Settings > Job Listings Settings Tab) that lets you add a Remote Work box to the listings. You can then demonstrate if the role is remote, which is perfect for freelancers or anyone that needs to work from home.

Increase traffic and high-quality candidate attraction
Using WP Job Manager will help your jobs get seen and listed on Google. It ensures your listings are prominent in the Google Job postings section at the job of the mage. This drives more traffic to your job listings site and ensures you see high-quality candidates applying for every role.
All the plugin features contribute to this, such as the automatic ability to add the job schema markup to each listing. The way you can customize each listing and make them easily searchable also enables search engines to rank them properly.
Get started with WP Job Manager today
Job posting structured data is a core aspect of the job posting schema markup. It’s extremely important for job board websites as it helps you rank better in search engines. Adding the job posting schema markup to your listings will help Google find them and display them for the relevant candidates to see.
The good news is this is easily done with WP Job Manager. Improve your job posting visibility on Google and attract the best candidates thanks to a range of features. Get started with WP Job Manager today if you want to fill positions with high-quality employees as quickly as possible. Download the plugin for free: what are you waiting for?